See this wiki for projects that have existing timelines in resolve and you just want to add your surround mix and export
Davinci Resolve - How to Import Surround Sound Mix and Export Surround File
| Open Davinci Resolve |
|
When you get trough the prompts Open a New Project or Existing Project |
|
| Click on Media Tab and add 5.1 audio clip to media pool |
|
Find the clip with the 5.1 interleaved audio that was exported Right click it and choose "Add into Media Pool" |
|
Choose to Change the frame rate Click "Change" |
|
| Next - Go to the Edit Tab |
|
Right click in the Media Pool area >Choose >Timeline>CreateNew Timeline |
|
Set the Timeline to be 1 Video Track 1 audio track that is 5.1 Uncheck Empty Timeline Click on "Create" Now add you video on to the timeline with the surround sound audio file set to 5.1 |
|
Next go to >Fairlight>Bus Format |
|
Bus 1 Choose Format 5.1 Click on OK |
|
To Start the Self Contained QuickTime export of the Final Resolve Project click on the Deliver Tab |
|
In the upper left corner click on Render Settings Choose >ProRes>ProRes 422 HQ |
|
Make Sure Single Clip is selected and Title the Filename and choose a location to save the file |
|
Click Browse to navigate to the folder you want to save the QuickTime |
|
Pick a Storage Drive and folder to save the file Click OK |
|
Make sure the Export Video is checked Or what ProRes Codec you'd rather use for lower or higher quality |
|
Or if you would like to export a UHD 3840 x 2160 version choose that setting FPS 23.976 (or 24 or whatever frame rate your timeline is) |
|
Choose Advanced Settings Make sure Retain Sub-black and Super White Data is checked |
|
Scroll back up in the tool and choose the Audio Tab Check the Export Audio box and set to Linear PCM, 24 Bit and Bus 1 stereo |
|
| Audio tab set to Bus1 5.1 |
|
Finally, if you are trying to playout via VLC OR ARE ADDING CAPTIONS you will need to change the timeline Start Timecode setting to start playback at 0 hour. Go to DaVinci Resolve locate the sequence you want to change in the Bin |  |
| Right click it and >Timelines>Starting Timecode |
|
| Set TimeCode to 00:00:00:00 |
|
Choose to Start Render to create the QuickTIme |
|
Once the file renders open in Quicktime and choose >Window>Show Movie Inspector
|
Should see audio settings as surround 5.1 (C, L, R, Ls, Rs, LFE) |
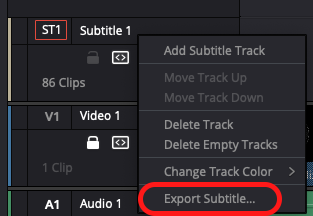
Back in your timeline... To export the generated subtitles as a .srt file, navigate to the subtitle track and right click Click on Export Subtitle... |
|
This menu should be called up Name your file and make sure you're saving it to the right destination Click Save |
|