How to Upload Files to Box with Email
You can easily upload files or send attachments to a specific Box folder by email when you enable the Allow uploads to this folder via email option. You can then forward email attachments or send files to the email address generated for that folder to upload your files. If you decide to forward email attachments to the folder, only the attachments will be uploaded, not the content of the message.
Please note the following:
- Enabling this feature will allow anyone with the email address to upload to the folder. Not all email providers support encrypted transmission, which can pose a security risk when uploading sensitive content. Take this into consideration when enabling this feature on a particular folder.
- Upload via email only works for file attachments, the body of the email will not be uploaded to Box.
- The cumulative size of the attachments cannot exceed 80MB.
- The folder owner and sender will receive a notification that files were uploaded successfully.
- Collaborators will also receive a notification if upload notifications are enabled for the folder.
Enable Upload via email using the Settings menu
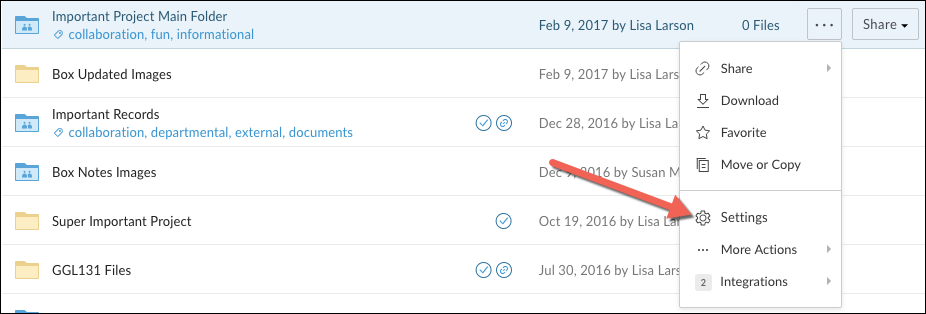
- Use the More Options button or Right click on the folder you'd like to enable email upload for.
- Click on settings in the more options menu.
- In the Uploads section of the Settings screen select the Allow uploads to this folder via email checkbox. A unique email address will be generated for the folder in the field below:
- You can copy this email address to your clipboard and enter it as a contact in your email address book or simply paste it into the "to" line of an email with attachments.
- You can also enable settings for the email upload option that will Only allow uploads from collaborators in this folder, or automatically Overwrite same-name files when uploading by email. These can be enabled or disabled using the checkboxes underneath the email address box in the Uploads section.
- Click Save Changes at the top of the screen to apply your settings.
Data management is the responsibility of the person accessing, downloading, manipulating or generating it. To better understand Acceptable Use policies surrounding Data, Backups, Access Management, etc, please follow this link: https://security.utexas.edu/policies/irusp. As always, feel free to contact CNS IT @ https://cns.utexas.edu/help if you have an other questions.
Related articles


